When we create a button it gets created with rounded corners, but there might be a client requirement to have square button, we achieve this by changing few properties of button.
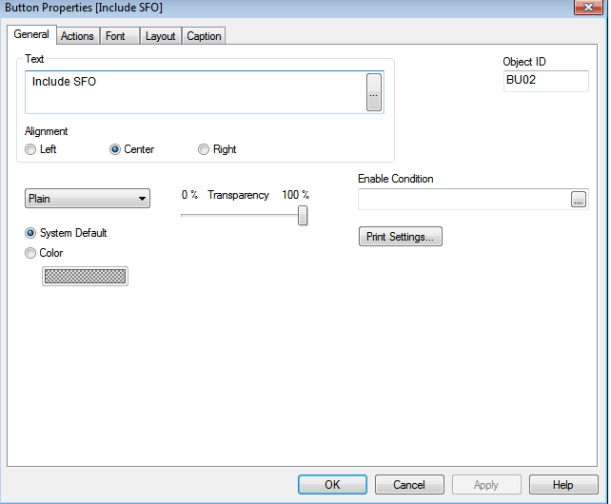


When we create a button it gets created with rounded corners, but there might be a client requirement to have square button, we achieve this by changing few properties of button.
Concatenate or Forced Concatenation:
When we use Concatenate keyword to add up two tables which have common columns to avoid synthetic key creation.


Rules:
The names of the fields must be exactly the same.
Unless a table name of a previously loaded table is specified in the concatenate statement the concatenate prefix uses the last previously created table.
NoConcatenate:
When we use NoConcatenate keyword, synthetic key gets created if there more than one same column.


Auto Concatenate:
If the field names and the number of fields of two or more loaded tables are exactly the same, QlikView will automatically concatenate the content of the different statements into one table.
Example:
load a, b, c from table1.csv;
load a, c, b from table2.csv;
The resulting internal table has the fields a, b and c. The number of records is the sum of the numbers of records in table 1 and table 2.
Rules:
The number and names of the fields must be exactly the same.
Qualify keyword comes into use when a synthetic key is generated due to data modelling issue.
When Qualify word is specified in the script, application maintains the full fledged names across the columns:

Below is the Data Model created after the reload:
If we want to qualify specific column we can provide the column name instead of *.


More than one column name can be comma separated.
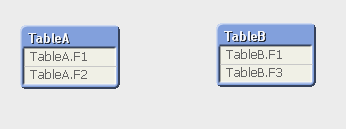
When we load two tables with a common field name in both tables, the tables get associated automatically based on the common fields. This is the associative functionality of QlikView.
Synthetic Keys get created when there are more than one common field name between one or more tables. It is a composite key representing combinations of the multiple key fields connecting the tables.


‘$Syn 1 Table’ got created having the synthetic key ‘$Syn 1’. Synthetic key removal can be done using any of the below methods:
Array Elements are sorted slowly to their proper location, by comparing each element with adjacent element continuously until the sorting is complete.
First element is taken and compared with the remaining set of elements one after the other and then it is swapped to its correct position. Then the second element is compared and moved, the comparison and swapping of elements continues until the array comes to a sorted manner i.e., there is no need of swaps anymore.
Bubble sort tracks the swap using a flag. Below is an example which explains the scenario:
Array: 84 69 76 86 94 91
After Pass #1: 84 76 86 94 91 69
After Pass #2: 84 86 94 91 76 69
After Pass #3: 86 94 91 84 76 69
After Pass #4: 94 91 86 84 76 69
After Pass #5 (Completed): 94 91 86 84 76 69
